
Ankle Taping: How to Tape an Ankle
Indications for Taping an Ankle
A painful or loose (unstable) ankle will often benefit from ankle taping to control motion, decrease pain, minimize the risk of re-injury, and improve athletic performance. Ankle taping, also known as wrapping an ankle, serves a similar role as an ankle lacer or an ankle support. However, ankle taping can often provide more support and less bulk that ankle lacers. In addition, ankle taping can be customized for each person to improve comfort and functionality. Ankle taping can be beneficial for athletes participating in sports such as basketball, volleyball, and soccer where ankle sprains and other ankle injuries are common. It is also commonly performed to help athletes compete when they have chronic ankle instability, peroneal tendonitis, ankle arthritis, or other symptomatic ankle conditions.
Thoughts on Ankle Taping
Ankle taping is somewhat time intensive. Ankle taping is often performed by athletic trainers, but individuals can learn to effectively tape their own ankles. It can take a few minutes to tape an ankle appropriately. Furthermore, there is often a learning curve associated with taping ankles: you will not necessarily “get it right” the first time. However, with practice you can learn to tape your ankle (or someone else’s) quite efficiently and effectively.
Materials Needed
- Ensure that the skin is clean and dry prior to starting the ankle taping
- Pre-wrap to cover the ankle or alternatively a neoprene ankle sleeve. Adhesive tape should not be applied directly to the skin
- One roll of strong cloth athletic tape (ex. hockey stick tape)
Instructions for How to Tape an Ankle
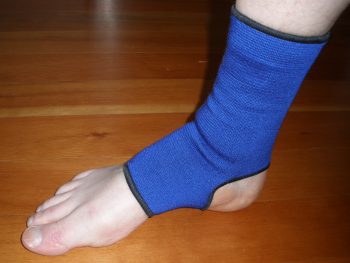
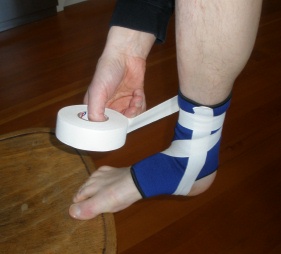
Step 1. Place a Pre-wrap or an ankle sleeve (Figure 1)
Tape can not be applied directly to the skin. A pre-wrap (ex. Pro wrap) should be placed over the ankle. Alternatively, a neoprene ankle sleeve or ankle support can be pulled over the ankle (The Adams Modification) and the tape applied directly to the ankle sleeve.
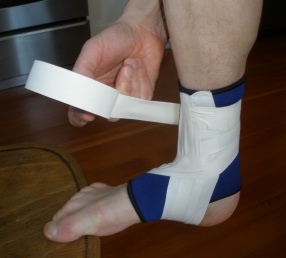
Step 2. Position the foot appropriately prior to wrapping (Figure 2)
The ankle should be setup in the exact position that it should be in after taping. This is usually neutral dorsiflexion (90 degrees relative to the lower leg) with the hindfoot everted (positioned so that the structures on the outside of the ankle are tight). It is often easiest to recreate this position by placing the forefoot on the edge of a chair. The knee should be bent to make it easier to bring the ankle up to a neutral position.
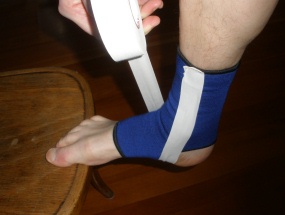
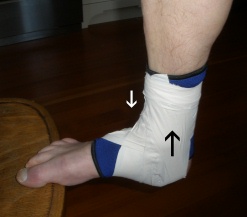
3. The “Medial Stirrups” are applied (Figure 3)
Tape wrapped from the inside to the outside of the ankle and then around the top of the ankle is applied. This is done to help pull the ankle joint to the outside (valgus position). This wrap is performed by:
- Start the tape on the inside above the ankle and wrapping under the arch of the foot (Figure 3A).
- Apply appropriate force on the tape to securely position the ankle joint in a stable position.
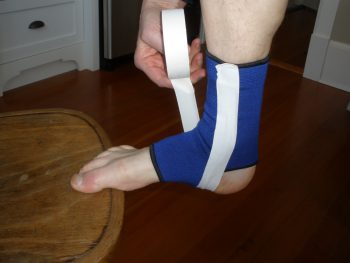
- Continuing around the ankle joint from the outside (Figure 3B)
- Ending by wrapping once or twice around above the ankle joint (Figure 3C)
- This is then repeated three times (four times if you need a particularly secure taping) with the three wraps placed side by side (Figure 3D)
-
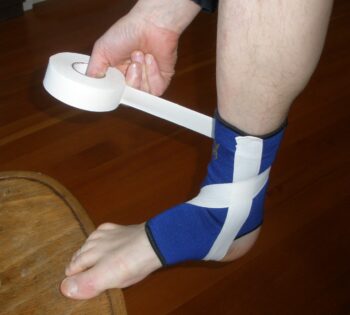
Figure 3B: Continue around the ankle joint from the outside
4. Medial and Lateral “Heel Lock” is applied (Figure 4)
Tape is then applied to “lock” the heel into position. This is performed by:
- Starting on the inside above the ankle joint (similar to performing the “medial stirrup” wrap) and wrapping the tape across the sole of the foot, more towards the heel region.
- Tape is then wrapped around the ankle similar, to the “medial stirrup” wrap
- This process is then repeated EXCEPT that it is done in the opposite direction, with the tape starting on the outside of the ankle and wrapping under the heel to the inside and then around the ankle. (Figure 4)
- This process is then repeated for the inside and outside heel wraps. This means that when you are finished there are two wraps of tape “locking” the heel starting from the inside, and two wraps that have been started from the outside.
Edited January 14th, 2024
sp/1.14.24
